Extended Side Angle Pose: Strengthen, Stretch, & Align Your Body!
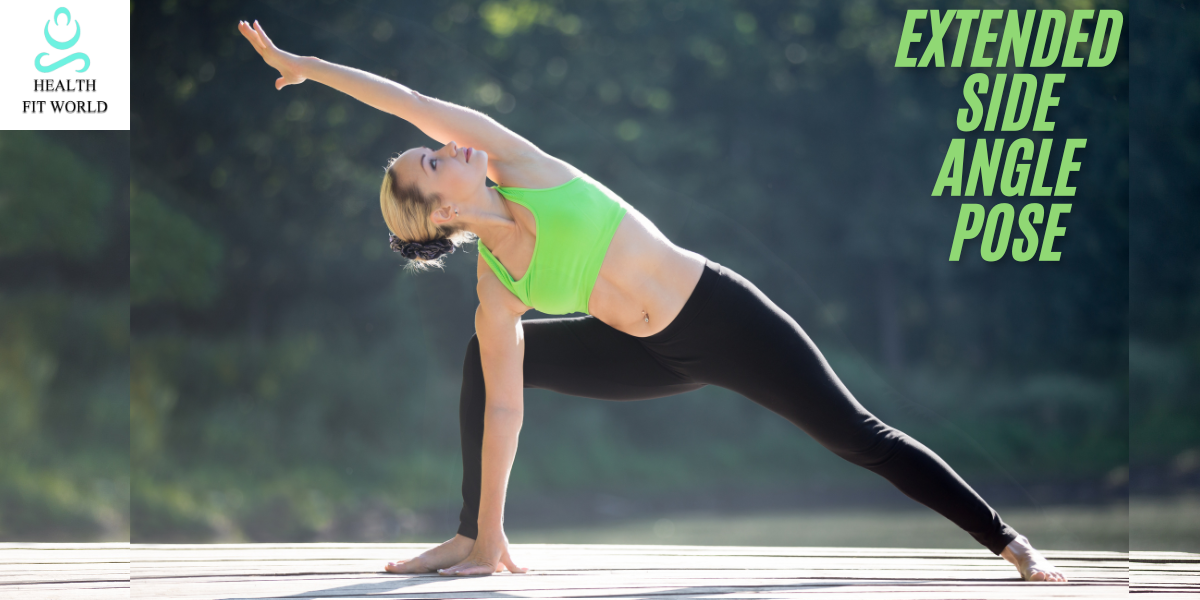
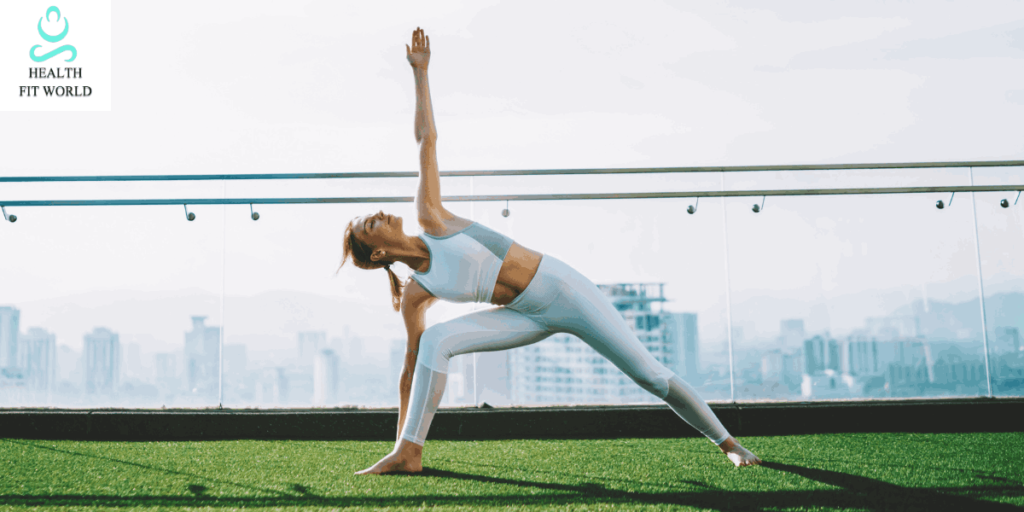
The Extended Side Angle Pose (Utthita Parsvakonasana) is an assertive standing yoga posture that strengthens the legs, core, and shoulders while creating an expansive stretch along the side of the body. This pose promotes balance, stability, and flexibility, making it an essential part of many yoga sequences, including those focused on strength-building and spinal alignment. Practicing this pose regularly can enhance posture, stimulate digestion, and increase mental clarity.
This step-by-step guide will help you understand how to perform the pose correctly, align your body effectively, and explore variations suited for different skill levels. Whether you’re a beginner or an experienced practitioner, this guide will provide insights to deepen your yoga practice and perfect your alignment.
Step-by-Step Guide to Performing Extended Side Angle Pose
1. Begin in a Grounded Standing Position:
- Start in Tadasana (Mountain Pose) with your feet together, standing tall and engaging your core muscles.
- Inhale deeply, expand your chest and exhale to ground yourself through your feet.
- Step your feet about four feet apart, ensuring they are parallel.
- Roll your shoulders back, keeping your spine elongated and your chin slightly tucked.
- Engage your leg muscles to stabilize your stance before transitioning.
2. Establish Proper Foot Alignment:
- Rotate your right foot outward at 90 degrees, ensuring your heel is aligned with the arch of your left foot.
- Turn your left foot inward (about 30 degrees) to maintain balance and proper alignment.
- Press firmly into the outer edge of your left foot to create a strong foundation.
- Ensure that the weight is evenly distributed across both feet.
3. Bend the Front Knee & Engage the Core:
- Slowly bend your right knee to form a 90-degree angle, ensuring the knee stays directly above the ankle.
- Keep your front thigh parallel to the floor and distribute your weight evenly.
- Engage your core muscles, pulling the navel inward to stabilize your torso.
- Avoid allowing the knee to collapse inward, keeping it aligned with the middle toes.
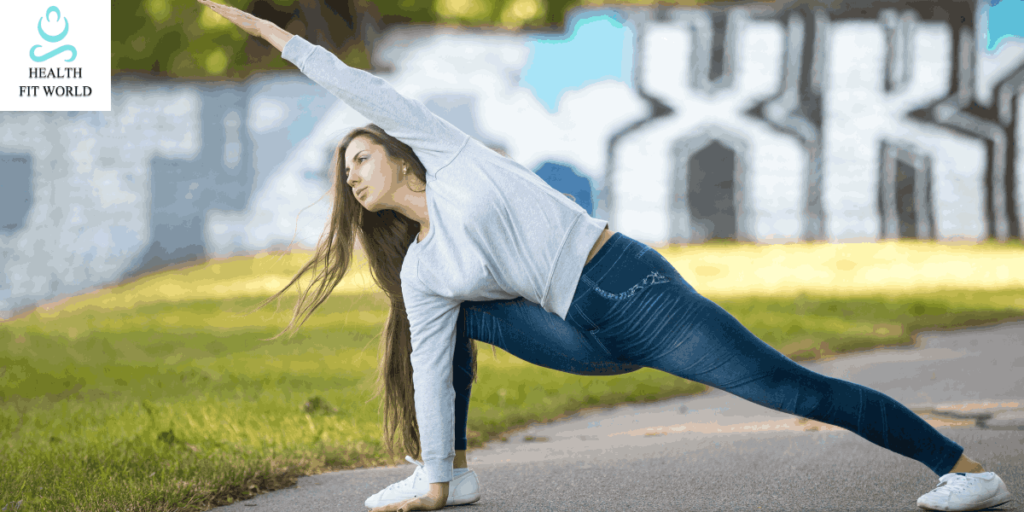
4. Extend the Torso & Lower the Arm:
- Inhale deeply and extend your torso toward your right thigh, maintaining length through your spine.
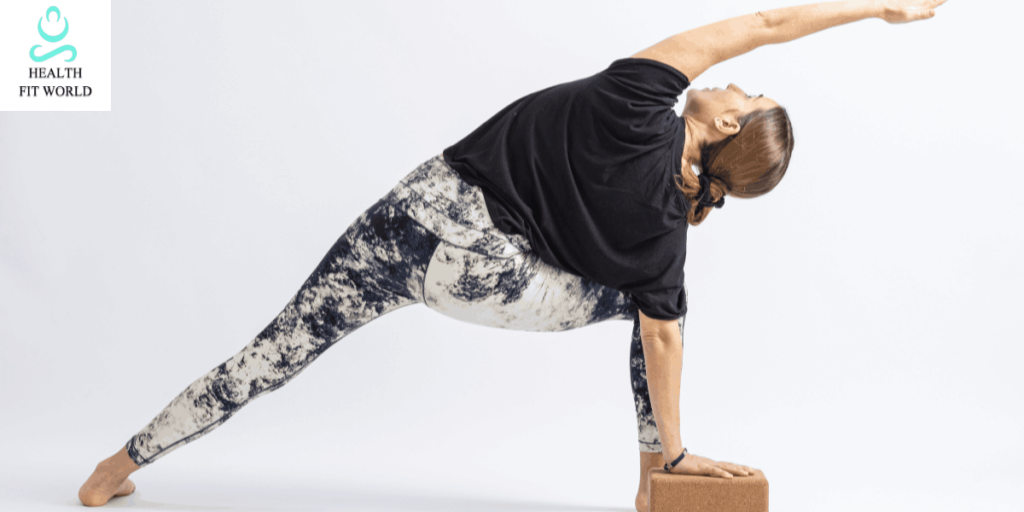
- Place your right hand lightly on the floor, a block, or rest it on your right thigh.
- Avoid collapsing into your lower hand; use it for gentle support.
- Keep the ribs lifted and maintain a sense of length in the side body.
5. Stretch the Top Arm Overhead:
- Extend your left arm overhead, reaching toward the side with your palm facing downward.
- Keep your shoulders stacked, ensuring your chest stays open and lifted.
- Engage your fingertips, stretching from the heel of your back foot to your fingertips.
- Maintain an elongated diagonal line from the back foot to the fingertips.
6. Align Your Head & Gaze:
- Turn your head to look past your left fingertips, ensuring the neck stays long.
- If this is uncomfortable, you may look forward or downward depending on your comfort level.
- Keep your jaw relaxed and avoid straining your neck.
- Maintain steady breathing, focusing on the connection between the head and spine.
7. Maintain Stability & Deep Breathing:
- Stay in this position for 30 to 60 seconds, breathing deeply and steadily.
- Focus on expanding the ribcage and engaging your oblique muscles.
- Maintain a connection between your feet, legs, core, and arms to feel the full-body stretch.
- Engage your quadriceps and glutes to stabilize the pose further.
8. Release & Transition to the Other Side:
- Inhale deeply and engage your core muscles.
- Slowly press into your feet, straighten your right leg, and bring your torso upright.
- Return your feet to a neutral stance before switching sides.
- Repeat the same steps on the left side.
- Take a few deep breaths to restore balance before transitioning out of the pose.
Common Mistakes & How to Fix Them
1. Collapsing the Chest:
- Instead of collapsing forward, rotate the chest upward to maintain an open position.
- Keep the shoulders stacked to allow for a proper side-body stretch.
2. Knee Extending Past the Ankle:
- Adjust your stance width to align the front knee over the ankle.
- Keep the shin vertical to prevent excessive pressure on the knee joint.
3. Overarching the Back:
- Keep your core engaged to prevent excessive lumbar extension.
- Maintain a neutral pelvis by gently tucking the tailbone.
Benefits of Extended Side Angle Pose
1. Physical Benefits:
- Strengthens the lower body: Engages the legs, knees, and thighs to build endurance.
- Enhances balance and stability: Activates the core and leg muscles for better posture.
- Opens the hips and groins: Stretches the inner thighs and hip flexors.
- Improves spinal alignment: Lengthens the spine and helps correct postural imbalances.
- Relieves lower back pain: Releases tension in the lumbar region.
2. Mental Benefits:
- Promotes mindfulness: Encourages focus and concentration.
- Reduces stress: Deep breathing and full-body engagement help calm the nervous system.
- Enhances mind-body connection: Strengthens awareness of movement and posture.
3. Digestive & Detox Benefits:
- Stimulates digestion: The gentle twist in the torso aids digestion and relieves constipation.
- Supports detoxification: Engages the abdominal muscles, promoting internal cleansing.
Variations of Extended Side Angle Pose
1. Beginner-Friendly Modifications:
- Use a yoga block: Place your hand on a block for support.
- Shorten your stance: Bring your feet closer together if you feel unstable.
- Rest your forearm on your thigh: Instead of reaching the floor, place your forearm on your thigh.
2. Advanced Variations:
- Bind the arms: Reach your bottom arm under your front thigh and clasp your top hand behind your back.
- Reverse Warrior Flow: Transition between Extended Side Angle Pose and Reverse Warrior on each exhalation.
- Floating Variation: Try lifting your bottom hand off the floor to challenge core stability.
Expert Tips for Perfecting the Pose
- Keep your feet firmly grounded to maintain balance and steadiness.
- Extend your torso fully to maximize spinal elongation.
- Avoid overarching the lower back by engaging your core muscles.
- Use a wall for support if your back heel lifts off the floor.
- Focus on deep breathing to maintain relaxation and control.
- If you experience difficulty holding the pose, slightly shorten the stance.
Conclusion
The Extended Side Angle Pose is a foundational yoga posture that builds strength, flexibility, and awareness. By maintaining proper alignment, focusing on breath control, and incorporating modifications, practitioners of all levels can benefit from this pose. Whether you want to enhance your practice, relieve tension, or increase stability, this pose is a versatile tool for physical and mental well-being. Practice it regularly, explore variations, and enjoy its transformative effects on your body and mind.
Frequently Asked Questions (FAQs)
- What is the primary purpose of the Extended Side Angle Pose?
This pose strengthens the legs, core, and shoulders while stretching the side body, improving balance, stability, and flexibility. - How do I prevent my knee from collapsing inward?
Ensure your knee stays aligned with the middle toes by engaging your thigh muscles and pressing firmly into the outer edge of your back foot. - Can beginners practice this pose?
Yes, beginners can modify the pose by using a yoga block for support or resting the forearm on the thigh instead of reaching toward the floor. - What should I do if I feel discomfort in my lower back?
Engage your core muscles and tuck your tailbone to avoid overarching your lower back. Adjust your stance if necessary. - Where should I place my gaze in this pose?
Depending on your comfort level and neck mobility, you can look past your raised fingertips forward or downward. - How long should I hold the pose?
Ideally, hold the pose for 30 to 60 seconds while breathing deeply and maintaining proper alignment. - What are some common mistakes to avoid?
Common mistakes include collapsing the chest, overextending the front knee, and losing core engagement. Focus on maintaining balance and lengthening the spine.